Create Module HowTo
Contents |
Introduction
this HowTo will take you through a process of creating your own module extension to OpenCms administration view.
Create Module
First you must create module container for your extension. Creation of a new module is described in detail at Defining_OpenCMS_structured_XML_content#Step_1_.E2.80.93_Create_the_module_and_configure_it. Make sure that you select all module folders to be created.
Create and Install Message Bundle
Next we need to create and install message bundle for our new module, so will be able to customise all workplace labels based on user's selected language. This requires the following steps:-
- Create messages class.
- Create action class and initiate the message bundle as part of the action class.
- Create your module specific workplace.properties file.
All these files must be published as part of your module /classes/ directory.
Create messages class
Message class is used to reference your module specific workplace.properties file at part of OpenCms. This is just a simple class extending org.opencms.i18n.A_CmsMessageBundle and the bundle name variable pointing to the module specific workplace.properties file location. Below is a sample Messages class in order to illustrate this.
package com.clicksandlinks.opencms.groupmail;

import org.opencms.i18n.A_CmsMessageBundle;
import org.opencms.i18n.I_CmsMessageBundle;

public class Messages extends A_CmsMessageBundle {

	public static final String GUI_NEWSLETTER_MASSMAIL_TOOL_NAME_0 = "GUI_NEWSLETTER_MASSMAIL_TOOL_NAME_0";
	public static final String ERR_PROBLEM_SENDING_EMAIL_0 = "ERR_PROBLEM_SENDING_EMAIL_0";
	public static final String ERR_BAD_SENDER_ADDRESS_0 = "ERR_BAD_SENDER_ADDRESS_0";
	public static final String ERR_BAD_SUBJECT_FIELD_0 = "ERR_BAD_SUBJECT_FIELD_0";
	public static final String ERR_BAD_SUBJECT_MESSAGE_0 = "ERR_BAD_SUBJECT_MESSAGE_0";
	public static final String ERR_BAD_TO_GROUP_0 = "ERR_BAD_TO_GROUP_0";
	public static final String GUI_USER_EDITOR_LABEL_IDENTIFICATION_BLOCK_COMPOSE_EMAIL_0 = "GUI_USER_EDITOR_LABEL_IDENTIFICATION_BLOCK_COMPOSE_EMAIL_0";
	public static final String MODULE_DATE_FORMAT = "MODULE_DATE_FORMAT";
	public static final String MODULE_EMAIL_SUBJECT_PREFIX = "MODULE_EMAIL_SUBJECT_PREFIX";

	private static final String BUNDLE_NAME = "com.clicksandlinks.opencms.groupmail.workplace";

      private static final I_CmsMessageBundle INSTANCE = new Messages();

   private Messages() {

        // hide the constructor
   }

   public static I_CmsMessageBundle get() {

       return INSTANCE;
   }

  public String getBundleName() {

       return BUNDLE_NAME;
   }
}
Create action class and initiate the message bundle as part of the action class
Action class is used to register the message bundle with OpenCms at start up. Again this is just a simple class this time implementing org.opencms.module.I_CmsModuleAction. The important thing here is to call the message bundle as part of the action class initialize method, so the message bundle gets loaded. Sample class below should demonstrate how to achieve this.
package com.clicksandlinks.opencms.groupmail;

import org.opencms.configuration.CmsConfigurationManager;
import org.opencms.db.CmsPublishList;
import org.opencms.file.CmsObject;
import org.opencms.main.CmsEvent;
import org.opencms.module.CmsModule;
import org.opencms.module.I_CmsModuleAction;
import org.opencms.report.I_CmsReport;


public class ActionClass implements I_CmsModuleAction {

	public void initialize(CmsObject adminCms, CmsConfigurationManager configurationManager, CmsModule module) {
		//Do a dummy load from resource bundle, so it gets registred with OpenCms.
		try{
			Messages.get().getBundle(adminCms.getRequestContext().getLocale()).getResourceBundle();
		}catch(Exception e){
			// Do not throw anything.
		}
	}

	public void moduleUninstall(CmsModule module) {
		// Do nothing.
	}

	public void moduleUpdate(CmsModule module) {
		// Do nothing.
	}

	public void publishProject(CmsObject cms, CmsPublishList publishList, int backupTagId, I_CmsReport report) {
		// Do nothing.
	}

	public void shutDown(CmsModule module) {
		// Do nothing.
	}

	public void cmsEvent(CmsEvent event) {
		// Do nothing.
	}
}
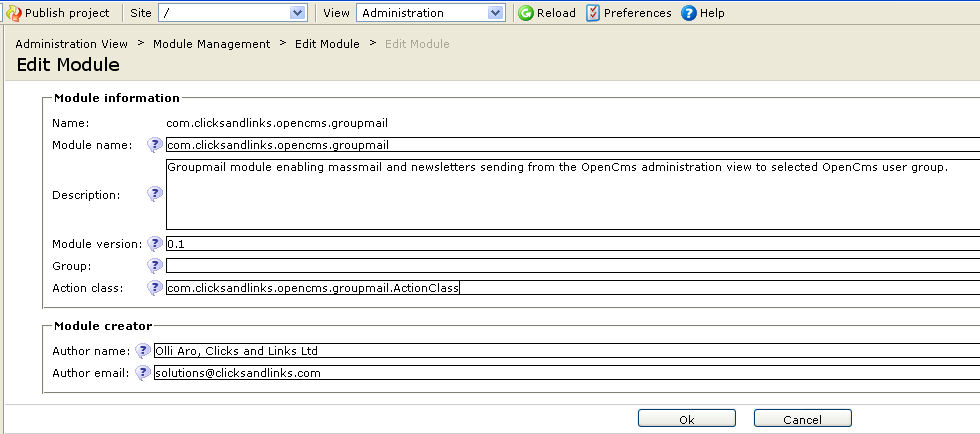
After you have created and uploaded the action class in module /classes/ directory you also need to register the action class with your module. This can be done in the module management by editing the "Action class" value.
Create your module specific workplace.properties file
Next we need to create a text file called workplace.properties in your module /classes/ folder. This file includes all language captions for your module. Below you can see a sample file on how your workplace.properties might look like. Creating a worplace.properties file for another language is easy. You just need to create another file with the required language suffix. For example for Finnish locale the properties file would be called workplace_fi.properties.
# Generic module settings.
MODULE_DATE_FORMAT=dd/MM/yy HH:mm:ss
MODULE_EMAIL_SUBJECT_PREFIX=[Mail from OpenCms]

#Administration view group name.
GUI_NEWSLETTER_MANAGEMENT_TOOL_GROUP_0=Administration

#Generic application captions.
ERR_PROBLEM_SENDING_EMAIL_0=Email could not be sent. Please contact your system administrator in order to check that the email server is configured correctly for the system.

# Tool root folder captions.
GUI_NEWSLETTER_MANAGEMENT_TOOL_NAME_0=Newsletter Management
GUI_NEWSLETTER_MANAGEMENT_TOOL_HELP_0=Click here to send mass emails and newsletters to selected groups of users.

# Mass mail tool folder captions.
GUI_NEWSLETTER_MASSMAIL_TOOL_NAME_0=Mass Mail
GUI_NEWSLETTER_MASSMAIL_TOOL_HELP_0=Click here to send mass email message to selected user groups.

# Mass mail tool captions.
GUI_USER_EDITOR_LABEL_IDENTIFICATION_BLOCK_COMPOSE_EMAIL_0=Compose Email
ERR_BAD_SENDER_ADDRESS_0=Sender email address in not valid.
ERR_BAD_TO_GROUP_0=To group is either missing or is not valid content management group.
ERR_BAD_SUBJECT_FIELD_0=Email subject cannot be empty.
ERR_BAD_SUBJECT_MESSAGE_0=Email message body cannot be empty.
label.massmail.currentDate=Date
label.massmail.fromAddress=From
label.massmail.fromAddress.help=The email address that will be used as sender in this email.
label.massmail.toGroup=To Group
label.massmail.toGroup.help=The user group that the email will be send to.
label.massmail.emailAttachments=Attachment
label.massmail.emailAttachments.help=Up to 5 optional attachment for the email from the download gallery.
label.massmail.emailSubject=Subject
label.massmail.emailSubject.help=The email message subject.
label.massmail.emailMessage=Message
label.massmail.emailMessage.help=The mail message body text.

# Newsletter tool folder captions.
GUI_NEWSLETTER_NEWSLETTER_TOOL_NAME_0=Newsletter
GUI_NEWSLETTER_NEWSLETTER_TOOL_HELP_0=Click here to send a content newsletter to selected user groups.
Add administration point in OpenCms administration view
Options within OpenCms administration view are rendered based on folder structure at /system/workplace/admin/. New administration points and structures can be just simple added by adding folders in /system/workplace/admin/ and ensuring that all relevant properties are configured.
Create module administration structure
Your custom module structure can be create by adding folders under /system/workplace/admin/. New administration point must include a single folder at /system/workplace/admin/ (e.g. /system/workplace/admin/groupmail/) as root folder. Within the root folder you can have an unlimited number of sub options. For example, my group mail module has options mass mail (/system/workplace/admin/groupmail/massmail/) and newsletter (/system/workplace/admin/groupmail/newsletter/). If your folder is actual action folder, so instead of just displaying list of administration options you would like actually to do something, you need to place index.jsp in this folder and the index.jsp will be automatically used to render the action form for your administration option. Administration point action forms will be explained more in detail in the next chapter.
Register admistration structure as module resources
Text
Administration point action forms
Text
